Mesh Camera
POV-Ray 3.7 > beta 39, 2010
The “mesh camera” is a new type of camera which uses a mesh as a guide to trace the rays into the scene, using the normal at each face. It was recently introduced in the beta version, and I helped to test and develop it at the POV-Team request.
Basically, this new feature has two main usages for now: baking textures and creating custom cameras. To show what it can do and how it works, I prepared a little tutorial and some basic demo scenes, which are also bundled with the latest beta release.
As this feature has great potential for many different uses, I opened a whole new subsection for it, where I will add subpages for specific uses, with quick tutorials and demo scenes (for the moment, these possible uses are listed at the end as “untested ideas”).
SYNTAX
Let’s start first with an introduction to the new camera syntax:
I hope you will forget that I didn’t use proper syntax specification… anyhow, here is the explanation of each item in the above specification:
rays_per_pixel:
This parameter controls the number of rays that will be shot from each face on the mesh. Each distribution bellow allows different values, but minimum is always 1.
distribution_type:
This parameter controls how pixels are assigned to faces:
#0 : This method allows single or multiple rays per pixel, with the
ray number for that pixel allocated to each mesh in turn. The index into each mesh is the pixel number. If there is no face at that pixel position, the resulting pixel is unaffected.
In this mode, you don’t get the benefit of summing the meshes sequentially. Each mesh represents a distinct ray for each pixel. Generally, it would be expected that the number of faces in each mesh is the same, but this is not a requirement.
#1 : This method allows both multiple rays per pixel and summing of meshes; i.e. the faces of all the supplied meshes are logically summed together as if they were one single mesh. In this mode, if you specify
more than one ray per pixel, the second ray for a given pixel will go to the face at (width * height * ray_number) + pixel_number, where ray_number is the count of rays shot into a specific pixel.
In this mode, if the calculated face index exceeds the total number of faces for all the meshes, no ray is shot.
#2 : Distribution method 2 is a horizontal array of sub-cameras, one per mesh (i.e. like method #0, it does not sum meshes). The image is divided horizontally into #num_meshes blocks, with the first mesh
listed being the left-most camera, and the last being the right-most. The most obvious use of this would be with two meshes to generate a stereo camera arrangement.
In this mode, you can (currently) only have a single ray per pixel.
#3 : This method will reverse-map the face from the UV co-ordinates; i.e. texture baking. When used back into the meshes, there are visible seams, and AA will produce incorrect pixels on the outside edge of the UV maps.
In this mode, you can (currently) only have a single ray per pixel.
You can use the smooth modifier to allow interpolation of the normals at the vertices. This allows for use of UV mapped meshes as cameras, with the benefit of not being resolution dependant, unlike the other distributions.
mesh_object:
One or more mesh or mesh2 object to be used as camera. These will be treated differently depending on the distribution method, as explained above.
Transformations on the meshes can be used here, and will reflect on the resulting image as it would be expected for a regular camera.
location:
On this special camera, location doesn’t really tells where the camera is placed (that information is on the mesh object itself), but is used to move the origin of the ray slightly off the face, along the normal of that face. The X and Y for location is not currently used, and the Z always refers to the normal of the face, rather than the real Z direction in the scene.
direction:
Again, this doesn’t correspond to the real direction vector of the camera. It serves only to reverse the normal of all the faces, if necessary. As with location, only the Z component is used.
USAGE
As I said above, this new feature has two main usages:
Texture baking:
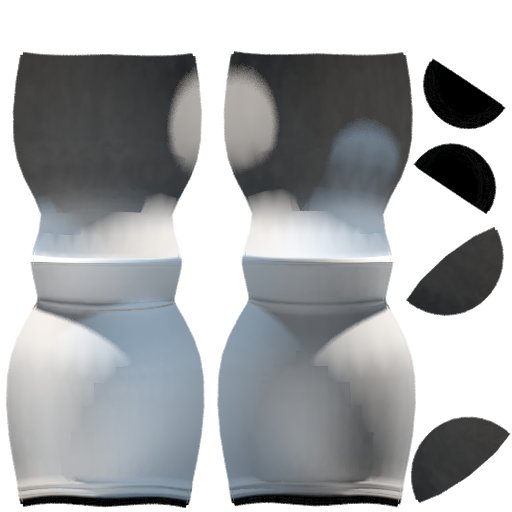
It is surely the usage that is going to be the most popular, because it is something other packages already do, and because it can be very useful for some specific and well established applications. I showed on the demo the potential as a tool to accelerate POV-Ray renderings, specially for camera animation, but the basics will apply when baking for other purposes, like generating texture maps for external applications (modelling packages, architectural presentations, games, VR environments, etc…).
As it’s expected, it only allows to bake meshes, so it will be only useful when your scene consists mostly on meshes. That’s why the demo scene included on the zip uses only mesh objects created with Wings3D: two vases and a room with a window. All of them have uv maps, which are also necessary to bake the textures.
The idea is to set up a scene in a way that would allow for normal rendering while developing the scene, later will allow to bake all the textures (with lighting) to image files, and finally will allow the use the baked textures to render the scene in much shorter time. The benefits are multiple: you can enhance/change the textures with an external paint program and render again in seconds, or add slow features to the baked render, like micro-normals for blurred reflections, focal blur, or any other feature wich used on a direct render will be very slow.
To accomplish the baking step, I used the animation features so that each mesh can be baked with a different value of the clock. Then, with a little script, I launch all the baking renders with custom output file names. These will be used later on a final step, where the lights are off and the baked textures have all emission on the finish. The baking script also calls to a “tool scene” which mitigates the problem with visible seams on the UV maps.
Custom cameras:
Perhaps not as exciting for the general public as the baking usage, this alternative use has great potential for experimentation, and surely will be the source for many useful tools that will use it for the more varied effects.
For a start, my examples illustrate how to mimic a classic pinhole camera, and how to add some interesting effects, like vignetting or distortion. Other uses could include custom focal blur, simulating specific lenses (with one or more elements), etc…
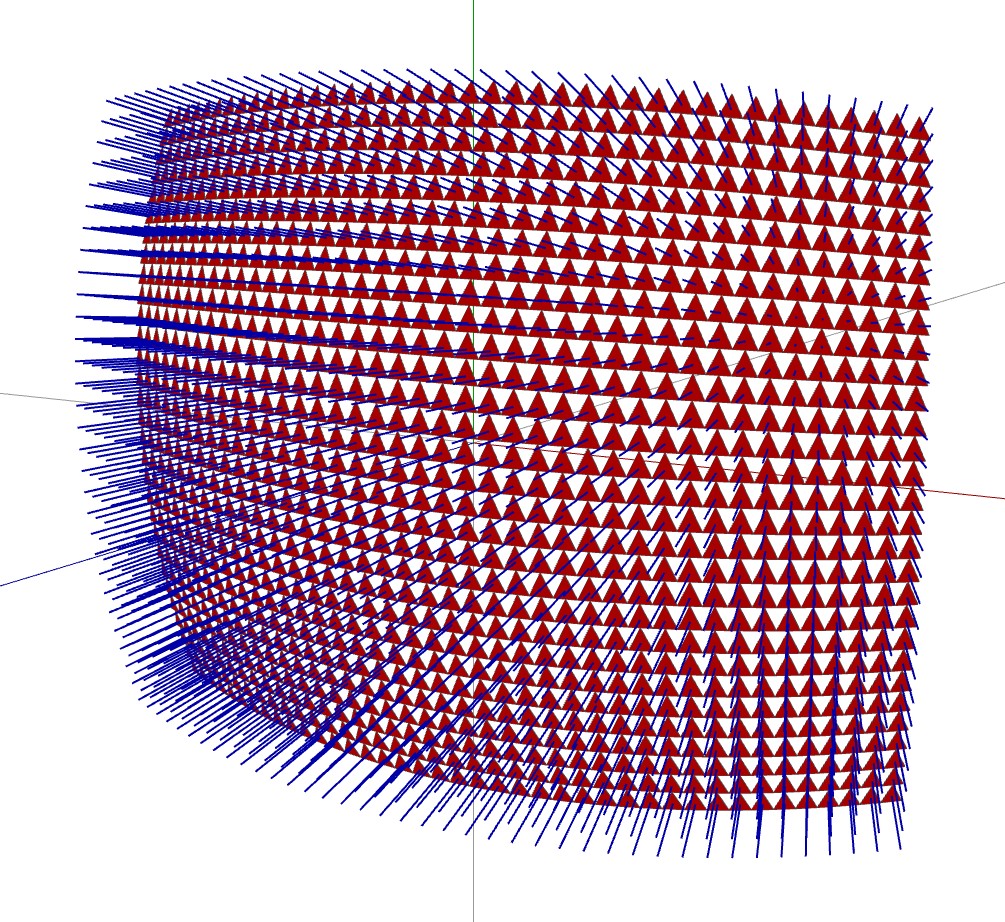
The basic premise of this approach is to use a mesh as a camera, but without instantiating it into the scene, as it was done for baking. Consider a standard POV camera: it could be represented as a mesh, with one face per pixel, all faces being set in the same plane, with the normal of the faces pointing in the direction of the camera, with angles diverging from the camera location.
So, I started just with that… a simple mesh with image_width columns and image_height rows of triangles, with all the normals pointing into the scene in the correct way. Sounds simple, but it took me a while to figure out the maths to do it, and a bit more learning how to use the useful macros from transforms.inc. In the end, I was so confused that my damaged brain decide to take a shortcut, and I was illuminated with the idea of using trace() to overcome all the mathematical difficulties.
Finally I ended up writing a set of macros to help creating and placing such camera meshes. Here are some quick informations about the macros:
- The meshes are mesh objects, since mesh2 will not get better results, and the former is easier to create for me.
- The meshes are optionally written to an include file for later use, as the creation process can be long for big resolutions.
- The mesh camera is created initially witouth a location or look_at, as it allows for easier creation, and for reuse of the camera on different locations/scenes once written to file.
- An additional macro automates the transformations needed to place the camera with the desired location and look_at.
DEMO SCENES
Here is the description of the included demos and auxiliary files:
common files:
- demo_globals.inc : Common global settings for all the scenes.
- demo_common.inc : Common textures, object and lighting.
- demo_room.inc : Room used by all the demos, created with Wings3D.
- vase1.inc & vase2.inc : Test objects for all the demos, created with Wings3D.
texture baking:
- baking_demo.pov : Demo to show the baking possibilities. First, set use_baking to 0 to see the scene witouth using any trick, just the “real thing”. Then use the script bake.sh to bake all the meshes on the scene. Finally, set use_baking to 2 and render again to compare the results (and speed) with the first render.
- baking_repair_seams.pov : Tool to mitigate the problem with visible UV seams on the baked textures.
- bake.sh : Script to automatically bake and repair all the textures for the demo. Calls the above scenes in turn for each mesh, with output files named according to the ones used on the baked textures (I will be glad to include a .bat version of this script if someone can send me an example).
custom cameras:
- meshcam_macros.inc : These are macros to help creating the grid-like meshes needed to make a custom camera, with the desired horizontal angle. As it was not interesting, I left out the orthographic mesh camera, and implemented only pinhole ones, with optional lens distortion. There is also a macro to help placing the camera at the desired “location”, looking at the desired “look_at”.
- meshcam_demo.pov : Example usage for the macros with distrib. #0. (#1 no yet explored). It shows how to use the macros to create a custom mesh camera and apply some effects, like antialiasing and vignetting, or to save it to a file for reuse.
- meshcam_demo_uv.pov : Simple usage demo for the macros with distrib. #3 and smooth (I’ve just explored this possibility, so this example is not as elaborated as the others).
- meshcam_stereo.pov : Example scene for usage of the macros with distrib. #2, to set up a stereo pair.
- meshcam_compare.pov : Tool to compare the mesh cameras created by the macros against the default perspective camera. I used it to verify if my results did match the standard camera.
UNTESTED IDEAS
I had a lot of weird ideas during last weeks, but these are the ones that where interesting enough for my brain to remember them. There are also some that were initially suggested by Chris Cason.
Texture baking:
- Baking “lighting maps” (that it’s, baking with plain white textures in all the objects), which can be used later to change the textures on the “baked render” with little cost.
- Baking pseudo-Ao maps for dirt patterns.
- Baking reflections for blurred reflections on stills?
- Baking maps for use on displacement mapping with Poseray.
- Dust maps baking the radiosity of a white box above?
Custom cameras:
- More interesting projections.
- Focal blur, with several layers of meshes with faces perturbed strategically?
- Using instances of the mesh camera in the scene, perhaps some interesting effects could be achieved, like I did with vignetting… I’m thinking for example on chromatic aberration.
- Creating camera animations in a long horizontal strip of frames, using distrib. #2.